 hamster-bot
Choose a convenient way to run the bot
Self-Hosted version
Download the bot and run it on your own server or computer. Full control, no monthly fee.
Builds available for:
Ready-to-use Online bot
No need to deal with hosting — the bot is already running on our server. Get your personal link right after payment.
- Isolated bot instance
- Developer support
VPS rental
VPS (VDS) is a virtual dedicated server.
For us, a VPS is a full computer located in the provider's datacenter. The provider is responsible for
uninterrupted server operation and stable internet connectivity. This matters for trading!
We will use a VPS to run the bot program. This is the most correct and reliable way to run
programs that trade on an exchange.
Which server configuration to choose: when renting your first VPS server you can just pick the
cheapest one.
Its performance will be enough. The software is optimized and not resource-hungry.
Example providers: zomro.com, contabo.com, melbicom.ru
If possible, use my
referral link: zomro.com/vps?from=413202 Promo code:
zomro_413202
The bot can run on any OS: Linux, macOS and Windows.
Recommended OS versions  Ubuntu:
 20.04 , 22.04 ,
24.04
❗️Choose a server location outside the US. (Exchanges usually block requests from the US). Europe and
Asia
regions are OK
You get remote access to this rented computer. (IP address, login (usually
root) and password)
To connect to your Linux VPS we will use SSH via the app termius (or putty)
Termius can even be installed on a smartphone. The free version of this program is enough.
(all
offers to buy can simply be ignored)
Linux (CLI) | INSTALLATION
You chose the path of renting your own VPS and running a self-hosted bot
First you need to connect to your VPS via SSH using the app
termius (This is free software which
persistently asks you to buy the paid version)
After paying for the server you receive the IP address, login (usually root) and password
for SSH access.
Installing the bot on a Linux server is very simple thanks to
ready-made scripts.
Just copy -> paste -> run the commands in the command
line
interface.
- 1. Create a new folder for the bot (in the example the folder
hb1) This way you can install many bots in different folders hb1, hb2 ...
:
mkdir -p /opt/hb1 - 2. Enter the created
folder:
cd /opt/hb1 - 3. Download and run the script
install_local.sh:
wget -qO- https://raw.githubusercontent.com/ksandric/hamster-bot/refs/heads/master/install_local.sh | bash
This command downloads the install_local.sh script file and runs it. (the script downloads -> unpacks the zip archive and creates a .service in systemd) - 4. During the process the script will ask you to enter a port from the keyboard and will check itself whether the entered port is free. You can't run more than one bot on the same port. I recommend choosing ports in order starting from 81 and onward.
Done! The bot is installed in the hb1 folder and a service
with the same name hb1.serviece will be started.
Information from the bot (work log) will be output in the terminal in real time. You can close termius and
move on
to
adding API keys and configuring strategies.
If you replace the bot's files on the server manually over SFTP -
don't forget the command to make the executable file runnable: chmod +x ./hb_c
- After starting the bot following these instructions it runs as a service (in the background and it will start automatically on server boot + auto-restart if it stops). To manage the service:
- Watch the console output in real time (work
log):
journalctl --follow -u hamster-bot_1.service - Check the current status:
systemctl status hamster-bot_1.service - Stop:
systemctl stop hamster-bot_1.service - Disable:
systemctl disable hamster-bot_1.service(Needed when removing the bot) - Restart:
systemctl restart hamster-bot_1.service
Linux (CLI) | UPDATE
When you have 2 or more bots running on your
VPS:/opt/hb1
/opt/hb2
/opt/hb3
To update the bot in the /opt/hb2 folder you need to run the following commands in order:
- 1. Go to the target folder (in the
example the folder hb2):
cd /opt/hb2 - 2. Download and run the script
update_local.sh:
wget -qO- https://raw.githubusercontent.com/ksandric/hamster-bot/refs/heads/master/update_local.sh | bash
Done! Only the bot in the folder /hb2 will be updated and restarted. The script finds the service associated with the chosen folder on its own.
Linux (CLI) | Finding bots on the server
If you have installed many different bots on your VPS running Linux
and can't figure out which .service belongs to which bot folder - I recommend using
the command:
grep -rl "hb_c" /usr/lib/systemd/system/
This command outputs a list of all services that contain
the executable hb_c (this is the bot's executable file). This way you can find the
service you need and see which folder it belongs to.
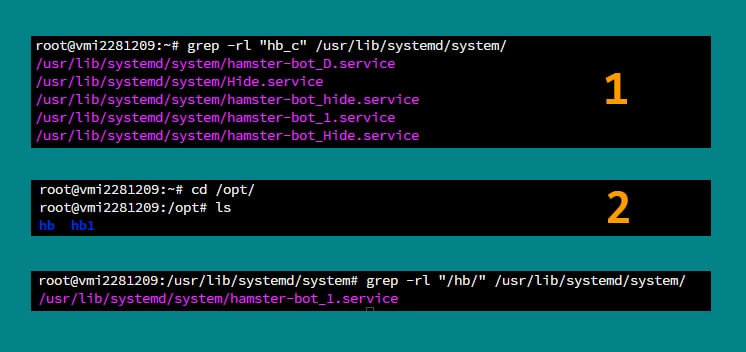
In the screenshot we see 5 services, while there are only (2) bots in the folders - meaning there are already extra ones.
If you enter a folder name as the search string, you will get
a list of services that reference that folder:
grep -rl "/hb/" /usr/lib/systemd/system/
If you want to remove a bot service you need to run the
commands:
1. systemctl stop hb2.service - stop the hb2 service
2. systemctl disable hb2.service - disable the hb2 service
3. rm -rf /usr/lib/systemd/system/hb2.service - remove the service file
hb2.service
Linux (CLI) | Restarting all active bots on the server
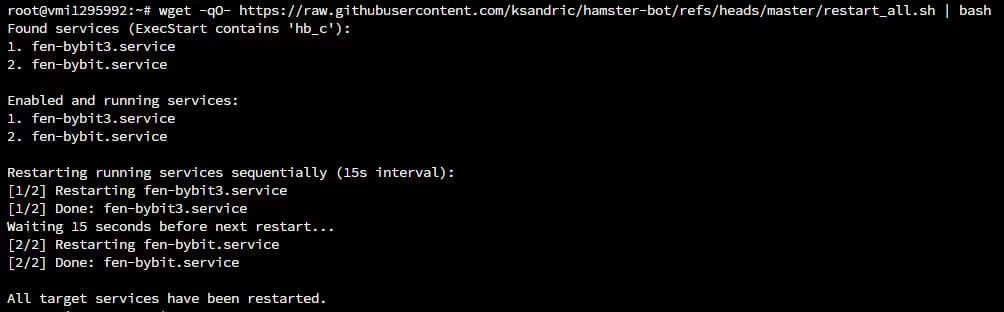
wget -qO- https://raw.githubusercontent.com/ksandric/hamster-bot/refs/heads/master/restart_all.sh | bash
1. This script finds all services associated with the bot. It separately lists which of them
are currently enabled.
2. Restarts only the enabled ones with a 15-second pause between services.
Linux (CLI) | Updating all active bots on the server
wget -qO- https://raw.githubusercontent.com/ksandric/hamster-bot/refs/heads/master/update_all.sh | bash
1. This script finds all services associated with the bot. It separately lists which of them
are currently enabled.
2. Updates only the active bots.
Linux (CLI) | Manual installation step by step
Video guide link youtu.be/jxb6aZQwtN4
First you need to connect to your VPS via SSH using the app termius (or putty)
- Create a folder for the bot (in the example the folder name
"hb")
mkdir -p /opt/hb - Go to the folder
cd /opt/hb - Download the zip
archive
wget https://github.com/ksandric/hamster-bot/blob/master/hb_linux-x64.zip?raw=true - If unzip is not installed -
install it
sudo apt install unzip - Unpack the
archive
unzip hb_linux-x64.zip?raw=true - Delete the zip
archive
rm -rf hb_linux-x64.zip?raw=true - Give the file execute permission (the executable
file is - hb_c)
chmod +x ./hb_c
After that the file can be run just like this ./hb_c but
that's not suitable for a bot. You need to create a service - so the bot runs in the background and doesn't close when the
console
session ends.
- Go to the
directory
cd /usr/lib/systemd/system/ - Create the file hamster-bot_1.service. You can create the file
with the command:
nano hamster-bot_1.service
(the name can be anything, the format is always.service. This way you can create multiple services but just make sure the bots have different ports set in their config files)
File content: hamster-bot_1.service
[Unit]

Description=hamster-bot_1

After=multi-user.target

[Service]

Environment="DOTNET_BUNDLE_EXTRACT_BASE_DIR=%h/.net"

Type=simple

ExecStart=/opt/hb/hb_c

WorkingDirectory=/opt/hb

RestartSec=61

Restart=always

[Install]

WantedBy=multi-user.target
- Save the changes and close the file
Ctrl+xthen press the keyYand then the keyEnter - Run the commands:
systemctl daemon-reloadsystemctl enable hamster-bot_1.serviceapt-get updateapt-get install -y libfreetype6apt-get install -y libfontconfig1apt-get install -y fontconfigsudo timedatectl set-timezone UTC- Optionally you can also install
fail2ban:
apt-get install fail2ban - To open the port on which you run the bot so the web interface is accessible from any browser by your server's IP address (in the example port 80):
-
iptables -I INPUT -p tcp --dport 80 -j ACCEPT ufw allow 80- To start the service run the
command:
systemctl start hamster-bot_1.service - Done! At this point the service is already available and will start automatically on server boot (+ auto-restart if it stops). To manage the service:
- Watch the console output in real time (work
log):
journalctl --follow -u hamster-bot_1.service - Check the current status:
systemctl status hamster-bot_1.service - Stop:
systemctl stop hamster-bot_1.service - Disable:
systemctl disable hamster-bot_1.service - Restart:
systemctl restart hamster-bot_1.service - After starting the bot, to read its log in real time you need to:
- Go to the folder
cd /opt/hb/logs - Open the log
tail -f log_here_date_of_log.log(this is the general log file + the bot also writes separate logs per strategy)
Linux (CLI) | Manual update step by step
Video guide link youtu.be/FJgu7OfgUWU
First you need to connect to your VPS via SSH using the app termius (or putty)
In the example the service name is: "hamster-bot_1.service".
The folder where the bot files are located: "/opt/hb"
- Stop the bot (stop the
service)
systemctl stop hamster-bot_1.service - Go to the bot's folder
cd /opt/hb - Download the zip
archive
wget https://github.com/ksandric/hamster-bot/blob/master/hb_linux-x64.zip?raw=true - Unpack the archive replacing files (the file
settings_program.json
will be ignored)
unzip -u hb_linux-x64.zip?raw=true -x settings_program.json - Delete the zip
archive
rm -rf hb_linux-x64.zip?raw=true - Give the file execute permission again
chmod +x ./hb_c - Start the
bot
systemctl restart hamster-bot_1.service - Done! The bot will continue working with your settings. Everything is applied on the fly without closing positions or orders
Administration recommendation
If your VPS running Linux has little memory:
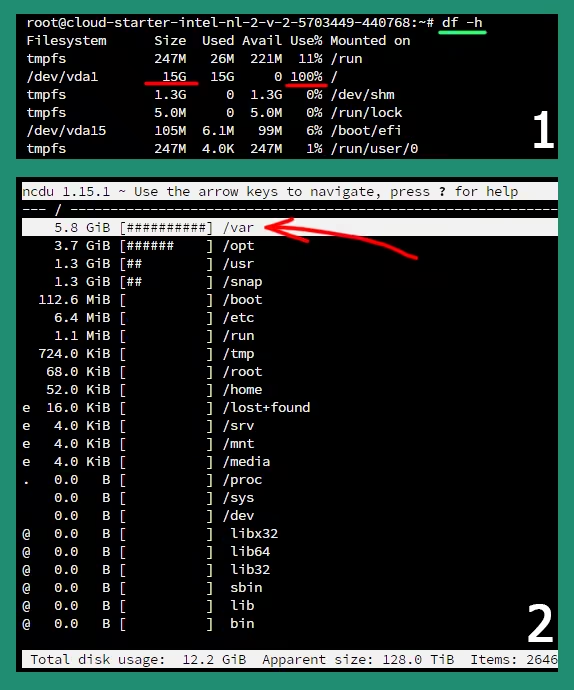
(1) View available and used memory:
df -h
(2) A utility with memory usage visualization. For easy
search of large folders:
ncdu /
I often notice that on Ubuntu systems with a small amount of memory
system logs can take up a lot of space. These two commands will free up space:
journalctl --vacuum-size=100M
rm /var/log/*.[0-9]
But it's better to fix the config so this situation doesn't come up in the first place.
The bot's logs can also take up a lot of space in some situations.
They live in the /logs folder
and here's what the log parameters look like in the config:
"log": {

    "log_months": 2, - how many months to keep logs

    "debug_mode": false,

    "log_size_mb": 50, - limit on log file size

    "log_files_count": 5 - file rotation N times once the size limit is reached },
In the logs the bot outputs CPU, RAM and disk usage. And it sends an alert to telegram at critical
values.
WatchDog — offline bot notification
WatchDog is a separate independent service (running on an external server) which monitors
that your bot is alive and running.
If the bot stops responding - you receive a notification in Telegram:
WARNING! Bot is offline.
Configured in the file settings_program.json:
- On/off - parameter
"watchdog": true/false - Trigger interval in minutes - parameter
"watchdog_timer_minutes"
Recommended value:60minutes
Trigger causes:
- The computer/server running the bot has stopped working or lost its internet connection;
- A software failure of the OS or the system hanging;
- The API key has expired or the exchange has banned it;
- An exchange outage;
- Changing the bot's settings or updating its version - changes the unique identifier key, which triggers a one-time offline notification.
Run on macOS
- Download the archive https://github.com/ksandric/hamster-bot/blob/master/hb_osx-x64.zip?raw=true
- Unpack the archive into a folder named
hbon the desktop - Open the command line (terminal)
- Go to the folder with the program. Run the command in the terminal
cd Desktop/hb - Give it execute permission
chmod a+x hb_c - After unpacking, run once:
xattr -dr com.apple.quarantine .— remove the quarantine flag after downloadcodesign --force --sign - ./hb_c— local signing
- Run the bot
./hb_c
The archive already includes scripts: mac_sign.sh for signing and run_tester_mac.sh for running the tester.
After starting the executable file the bot's WEB interface is available locally in the browser at http://127.0.0.1:80.
Run on Windows
Guide on how to open a port on Windows
After starting the executable file the bot's WEB interface is available locally in the browser at http://127.0.0.1:80. If the bot is running on a server then the interface will be available at your server's IP address on the port from the config file.
It is recommended to install Dimension 4 or nettime to sync time on windows
Telegram connection:
-
Getting a token to log in to the WEB interface
- After clicking the "Get token" button - the token is sent as a message from the telegram bot @new_hamster_bot
- For the bot to be able to send you a private message you need to start a dialogue with the bot by pressing the
/startbutton - A one-time login token looks approximately like this:
re0hcc4rIE6cYUI - The token is valid for 24 hours from the moment it was created
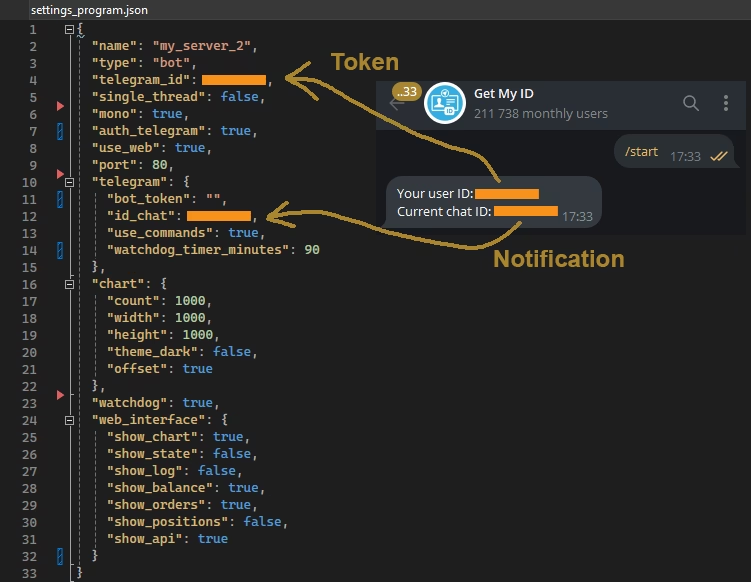
- ⚠️ The message is sent to your telegram id. This id must be
set in the file
settings_program.jsonparameter"telegram_id"(to apply the changes you need to restart the application ⚠️) - Get your
"telegram_id"using the bot @fetch_id_bot
-
Getting notifications from the bot in
telegram
- The id of the chat to which the notification should be sent must be set in the file
settings_program.jsonparameter"id_chat" - Get the
"id_chat"of the chat you need using the bot @fetch_id_bot. If you need to get theid_chatof a specific chat - add the bot @fetch_id_bot to the chat and it will immediately send you the id (for a chat it's a negative number). To get theid_chatof a telegram channel - forward any post from the channel to the bot @fetch_id_bot - (optional) You can set in the settings file
settings_program.jsonthe token of your own telegram bot."bot_token": "",. But the token to log in to the WEB interface is only sent by the bot @new_hamster_bot - For more flexible notification configuration you can set a separate chat for each strategy setting
individually. In the settings section
"tg_notification"parameter"id_chat"